实战:使用 ElasticSearch 8.13 实现混合搜索(1):构建 Cohere embedding 工作流
实验目标:选定测试数据集,给定可验证的指标
目的:以最快速度实现混合搜索的原型( Proof-of-concept, PoC, 或 rapid prototyping )。 我们可以在原型构建好之后对各个组件进行微调和进一步测试,以获得更好的效果。
我们使用 Kaggle 上的 Six TripAdvisor Datasets for NLP Tasks1 中的纽约餐厅评论作为数据集,以验证我们是否较好地实现了语义搜索( semantic search )和重排序( re-ranking )。
可验证的指标:
- 关键词搜索
- 语义搜索:验证 Cohere 提供的 embedding 算法和 ElasticSearch 的 kNN 搜索
- 重排序:验证 Cohere 提供的 re-ranking 算法
为节约 PoC 时间,我们使用 Elastic Cloud 作为我们的原型验证。 使用 docker compose 构建本地原型的步骤,我们将另文讲解。
概念解释
- embedding :即语言的向量化23,根据其语意生成一个向量,指代其语意。
- 混合搜索 hybrid search :即关键字搜索( keyword search )与语义搜索( semantic search )相融合。
- 检索增强生成 RAG (Retrieval Augmented Generation) 4:通过自有垂直领域数据库检索相关信息,然后合并成为 prompt 模板,给大模型生成漂亮的回答。本文最终的目的就是使用 ElasticSearch (下称 ES )实现混合搜索,以构建 RAG ,服务于我们的领域数据搜索。
系统架构和实验计划
大概的系统架构如下图所示。
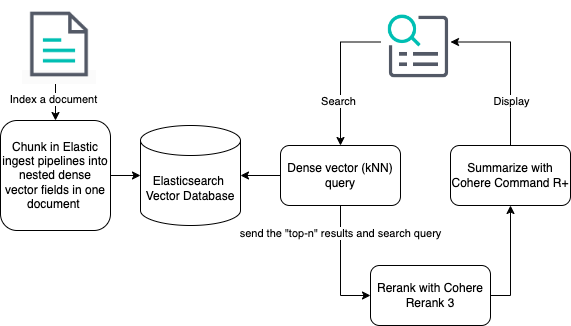
实验计划
- 小样本测试
- 语义搜索:验证 Cohere 提供的 embedding 算法和 ElasticSearch 的 ANN 搜索。
- 建立 ES 的导入数据 Ingest Pipeline, chunking 长文到合适规模。
- 重排序:验证 Cohere 提供的 re-ranking 算法
- 大样本测试:
- 构建本地测试环境
- 导入真实世界测试数据
本节将实现 1.1 。
小样本测试
我们根据 Elastic search labs 官网提供的指南,在 Elastic Cloud 的控制台进行测试。
在较新的 ES 版本中(8.11以上),已经内置了对 embedding 向量化和内积的支持。而且可以与第三方模型提供方(如 Hugging Face 和 OpenAI )进行整合。
我们注册一个 Cohere 账户。 使用其 API Key 在 Elastic Cloud 的控制台中输入命令,建立模型。
PUT _inference/text_embedding/cohere_embeddings
{
    "service": "cohere",
    "service_settings": {
        "api_key": <api-key>,
        "model_id": "embed-english-v3.0",
        "embedding_type": "byte"
    }
}
命令将返回:
{
  "model_id": "cohere_embeddings",
  "task_type": "text_embedding",
  "service": "cohere",
  "service_settings": {
    "similarity": "dot_product",
    "dimensions": 1024,
    "model_id": "embed-english-v3.0",
    "embedding_type": "int8"
  },
  "task_settings": {}
}
建立了一个 1024 维的 int8 (即 byte ) embedding 。
使用以下命令建立 embedding 索引:
PUT cohere-embeddings
{
  "mappings": {
    "properties": {
      "name_embedding": {
        "type": "dense_vector",
        "dims": 1024,
        "element_type": "byte"
      },
      "name": {
        "type": "text"
      }
    }
  }
}
命令返回 acknowledged ,表示索引已经建立。
我们使用一些书籍归类来进行实验。
POST _bulk?pretty
{ "index" : { "_index" : "books" } }
{"name": "Snow Crash", "author": "Neal Stephenson", "release_date": "1992-06-01", "page_count": 470}
{ "index" : { "_index" : "books" } }
{"name": "Revelation Space", "author": "Alastair Reynolds", "release_date": "2000-03-15", "page_count": 585}
{ "index" : { "_index" : "books" } }
{"name": "1984", "author": "George Orwell", "release_date": "1985-06-01", "page_count": 328}
{ "index" : { "_index" : "books" } }
{"name": "Fahrenheit 451", "author": "Ray Bradbury", "release_date": "1953-10-15", "page_count": 227}
{ "index" : { "_index" : "books" } }
{"name": "Brave New World", "author": "Aldous Huxley", "release_date": "1932-06-01", "page_count": 268}
{ "index" : { "_index" : "books" } }
{"name": "The Handmaid's Tale", "author": "Margaret Atwood", "release_date": "1985-06-01", "page_count": 311}
这里我们已经有 books ES 索引了,我们现在可以使用 Cohere 实现 embedding 了!
为实现这一步骤,我们需要建立 ingest pipeline ,使用 inference 处理器调用我们在一开始定义的 inference 流程。
PUT _ingest/pipeline/cohere_embeddings
{
  "processors": [
    {
      "inference": {
        "model_id": "cohere_embeddings",
        "input_output": {
          "input_field": "name",
          "output_field": "name_embedding"
        }
      }
    }
  ]
}
请注意我们在这里并没有引入 chunking 机制—— embedding 算法往往包括 token 长度限制,对于过长的文章,我们将在下文中讲解如何引入 chunking 机制5。 ElasticSearch 承诺将在未来将 chunking 整合进工作流,实现 chunking 的自动化。
既然我们已经有了源索引和目标索引,现在可以对我们的文档进行重新索引。
POST _reindex
{
  "source": {
    "index": "books",
    "size": 50
  },
  "dest": {
    "index": "cohere-embeddings",
    "pipeline": "cohere_embeddings"
  }
}
经过上边所有的准备工作,我们终于可以开始 kNN 搜索啦!
GET cohere-embeddings/_search
{
  "knn": {
    "field": "name_embedding",
    "query_vector_builder": {
      "text_embedding": {
        "model_id": "cohere_embeddings",
        "model_text": "Snow"
      }
    },
    "k": 10,
    "num_candidates": 100
  },
  "_source": [
    "name",
    "author"
  ]
}
返回语义上最接近 Snow 的书名:
{
  "took": 280,
  "timed_out": false,
  "_shards": {
    "total": 1,
    "successful": 1,
    "skipped": 0,
    "failed": 0
  },
  "hits": {
    "total": {
      "value": 6,
      "relation": "eq"
    },
    "max_score": 0.7993995,
    "hits": [
      {
        "_index": "cohere-embeddings",
        "_id": "kq5JLI8BXDnCEiW9n9Hy",
        "_score": 0.7993995,
        "_source": {
          "name": "Snow Crash",
          "author": "Neal Stephenson"
        }
      },
      {
        "_index": "cohere-embeddings",
        "_id": "la5JLI8BXDnCEiW9n9Hy",
        "_score": 0.6490965,
        "_source": {
          "name": "Fahrenheit 451",
          "author": "Ray Bradbury"
        }
      },
      {
        "_index": "cohere-embeddings",
        "_id": "lK5JLI8BXDnCEiW9n9Hy",
        "_score": 0.6256815,
        "_source": {
          "name": "1984",
          "author": "George Orwell"
        }
      },
      {
        "_index": "cohere-embeddings",
        "_id": "lq5JLI8BXDnCEiW9n9Hy",
        "_score": 0.61833817,
        "_source": {
          "name": "Brave New World",
          "author": "Aldous Huxley"
        }
      },
      {
        "_index": "cohere-embeddings",
        "_id": "k65JLI8BXDnCEiW9n9Hy",
        "_score": 0.6160307,
        "_source": {
          "name": "Revelation Space",
          "author": "Alastair Reynolds"
        }
      },
      {
        "_index": "cohere-embeddings",
        "_id": "l65JLI8BXDnCEiW9n9Hy",
        "_score": 0.5937124,
        "_source": {
          "name": "The Handmaid's Tale",
          "author": "Margaret Atwood"
        }
      }
    ]
  }
}
下文预告
我们在本节中使用 Cohere 提供的 embedding 功能和 ES 自带的 kNN 搜索,实现了语义搜索。 在下一节中我们将构建 ES 本地测试环境以方便下一步的研究。
在更之后的章节中,我们将使用 ES 的 ingest pipeline 引入大规模数据,测试语义搜索功能。 最后我们将调整 ingest pipeline 以适应多语种(中文)文档,并测试 Cohere 提供的重排序功能。